

Deploying OpenWISP Pro on AWS
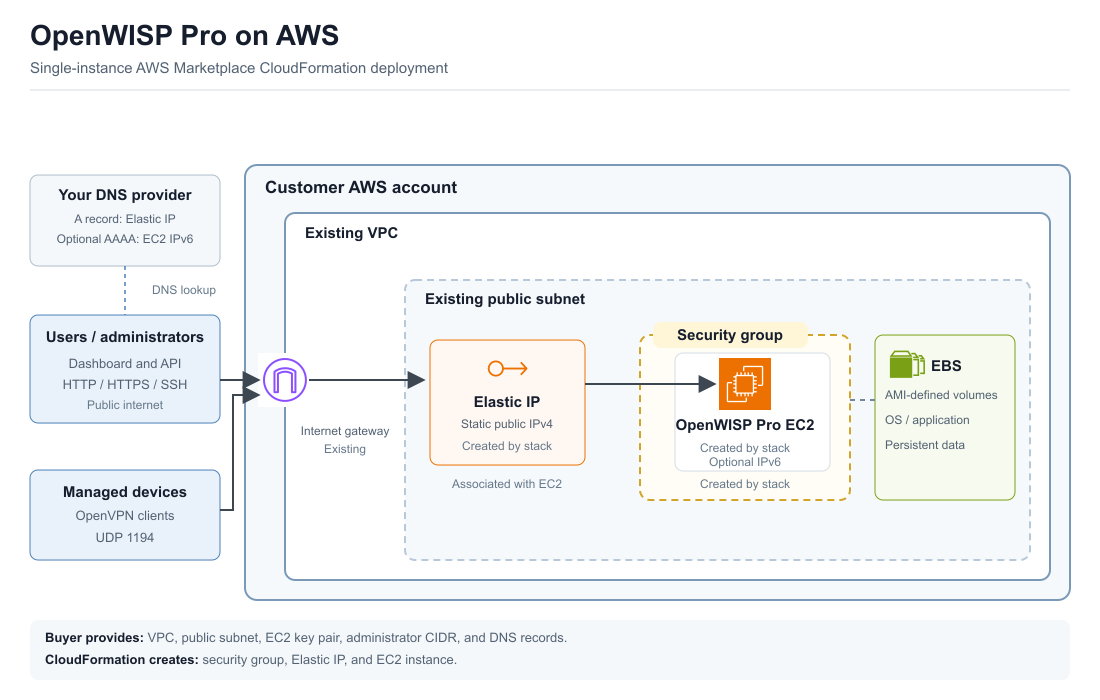
OpenWISP Pro is a cloud image that you can launch from AWS Marketplace. This tutorial walks you through subscribing to the image, deploying it either manually or with a CloudFormation template, and configuring OpenWISP.
Important
Be among the first to deploy OpenWISP Pro from AWS Marketplace. Register through the interest form to receive availability updates.
Launch OpenWISP Pro Standard from AWS Marketplace
To begin, sign in to the AWS Management Console. If you do not have an AWS account, create one before continuing.
Open AWS Marketplace, enter
OpenWISP Pro Standard in the search field, and select the listing.
Review the product information, usage instructions, and pricing before
subscribing.
Choose Continue to Subscribe, review the terms and conditions, and choose Accept Contract. Once the subscription has been processed, choose Continue to Configuration to prepare the image for launch. You need an AWS account that can launch EC2 instances. The CloudFormation path also requires permission to create a stack and its resources.
Choose one of the following deployment paths. Both use the same SSH and post-launch configuration procedure.
Launch an EC2 instance manually
Use this path to configure the instance and network settings in the AWS console yourself.
Configure and launch the instance
On the configuration page, select Amazon Machine Image (AMI) as the delivery method, the software version you want to deploy, and the AWS Region where the instance will run. Choose Continue to Launch. Under Launch Action, choose Launch from Website. This AWS Marketplace action opens the EC2 launch form:
For EC2 Instance Type, choose an x86-64 instance size that meets your workload's needs.
c7a.largeandt3.mediumare suitable starting points, subject to availability in the selected Availability Zone.For VPC Settings, select the Virtual Private Cloud (VPC) in which OpenWISP will run. A VPC is the network that contains your AWS resources.
For Subnet Settings, select a public subnet: a subnet whose route table sends internet-bound IPv4 traffic to an internet gateway and that assigns a public IPv4 address to the instance. See enable internet access using an internet gateway if you need to prepare your VPC first. To use IPv6, select a dual-stack subnet and follow AWS guidance to configure IPv6 for your VPC.
For Security Group Settings, choose Create new security group, enter a name and description, then configure the following inbound rules:
Type
Protocol
Port
Source
Purpose
HTTP
TCP
80
0.0.0.0/0HTTP connections
HTTPS
TCP
443
0.0.0.0/0HTTPS connections
SSH
TCP
22
An address or network you choose
Server administration
Custom UDP
UDP
1194
0.0.0.0/0VPN connections
If your VPC and subnet support IPv6, add equivalent HTTP, HTTPS, and UDP 1194 rules with
::/0as the source. For SSH, choose the source that fits your access policy; for example, the AWS console can use your current public IP address. You can change any of these rules later in the AWS console.Ports 80 and 443 allow web traffic to reach the server. Port 1194 allows remote VPN clients to establish a connection. For this image, the VPN rule uses UDP, so select Custom UDP and enter
1194as the port.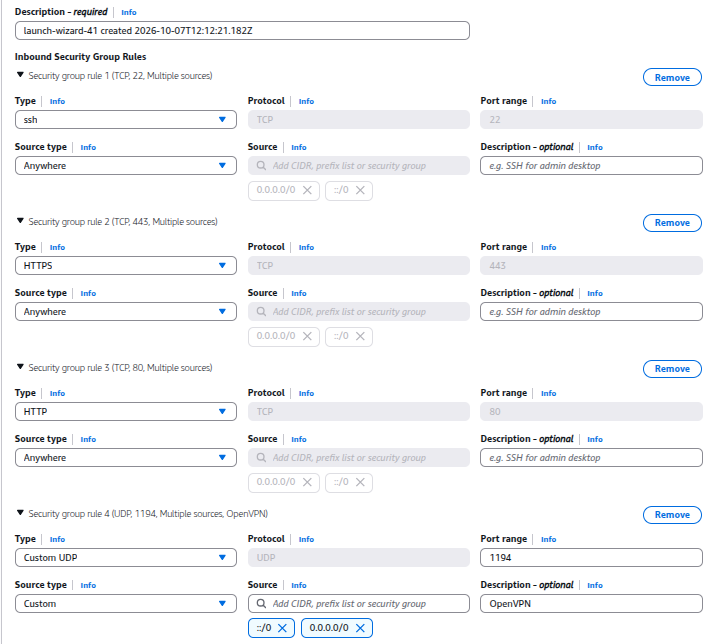
For Key Pair Settings, select an existing key pair in the chosen Region, or choose Create a key pair in EC2. Keep the private key on your computer: you will need it to authenticate your SSH connection.
Review the configuration and choose Launch.
Open the Amazon EC2 console in the same Region and select Instances to find your new server. Wait for its state to become Running and for its status checks to pass before connecting.
Associate an Elastic IP address
Once the instance is running, consider associating an Elastic IP address with it. An Elastic IP is a static public IPv4 address that you can keep associated with the server or move to a replacement instance.
A stable address is useful for both web access and VPN connections: users, devices, and DNS records can continue to use the same endpoint. An automatically assigned public IPv4 address can change when an EC2 instance is stopped and started.
An Elastic IP provides IPv4 connectivity only. If you need IPv6, configure it on the VPC and subnet, then create a DNS AAAA record for the instance's assigned IPv6 address.
For instructions, see the AWS guide to associate an Elastic IP address with an instance.
Deploy with a CloudFormation template
Use this path to have CloudFormation create an EC2 instance, security group, and Elastic IP address for you. You provide an existing VPC, subnet, key pair, and DNS records. The template uses the Marketplace image and does not create IAM roles, IAM policies, or key pairs.
On Continue to Configuration, choose the CloudFormation template delivery method, software version, and Region. Continue to launch and open the supplied template in the CloudFormation console.
Enter a stack name and review the template parameters:
OpenWISPAMI: use the Marketplace-provided image value. Marketplace may display this as an SSM parameter rather than an image ID.VpcId: select your existing VPC.SubnetId: select a public subnet in that VPC. It must route internet-bound IPv4 traffic to an internet gateway and assign a public IPv4 address to the instance.NetworkMode: keepipv4for IPv4-only or choosedual_stackto assign an IPv6 address as well. Dual-stack requires IPv6 CIDRs on the VPC and subnet and a::/0route to the internet gateway. See AWS guidance to configure IPv6 for your VPC. The template does not modify your VPC, subnet, or routes.VpnCidr: controls the IPv4 source allowed to connect to OpenVPN. It defaults to0.0.0.0/0. Change it if only known networks should be able to establish VPN connections.KeyName: select your existing regional EC2 key pair. This is its name, not the contents of its private key.InstanceType: select an x86-64 instance type that suits your workload and is available in the selected Availability Zone.
Review the stack details and create the stack. Wait for
CREATE_COMPLETE. If creation fails, inspect the Events tab before retrying. Check instance type availability, subnet/VPC matching, and permissions.Open the stack's Outputs tab.
InstanceIdidentifies the EC2 instance;ElasticIpAddressis its static public IPv4 address.Locate
InstanceIdin the EC2 console and wait for Running and passing status checks. Point dashboard, API, and any separate VPN DNS records toElasticIpAddressbefore running the configuration wizard.Follow the shared SSH and configuration steps below. Stack creation does not run the interactive wizard or establish application readiness.
The template creates a security group and an Elastic IP address. Review and adjust the security group rules in the EC2 console to meet your access policy. Do not allocate a second Elastic IP for this deployment path; the stack already creates one.
With dual_stack, find the assigned IPv6 address in the EC2 console's
instance networking details. Publish DNS AAAA records only after testing
HTTPS and any required VPN connectivity from an IPv6 client. Keep DNS A
records pointing to the Elastic IP. The IPv6 address is not an Elastic IP
and can change when the instance is replaced.
Choose the network mode at initial launch. Changing NetworkMode
replaces the instance, rather than simply changing its security group. Do
not change it on an existing deployment without a verified backup and
data/settings migration procedure.
Connect to the instance using SSH
Once the instance has passed its status checks, follow the AWS guide to
connect to your Linux instance using SSH.
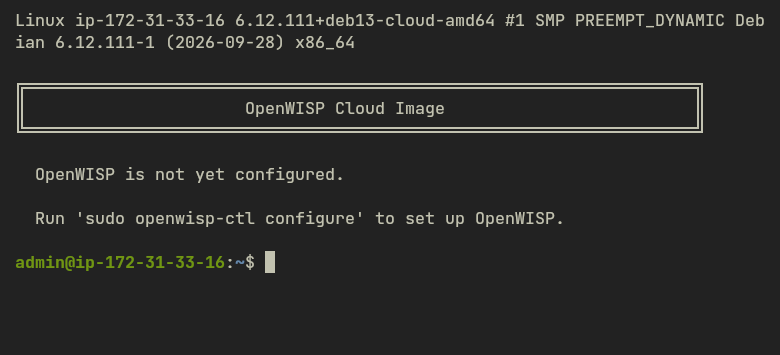
Use admin as the username and the private key for the key pair you
selected at launch. After connecting, you will see the OpenWISP Pro
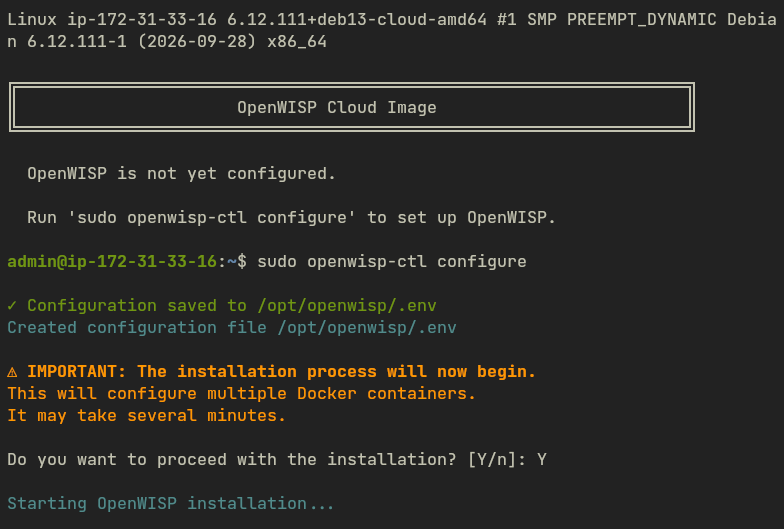
prompt:
Configure OpenWISP Pro
In your SSH session, run the following command to start the configuration wizard:
sudo openwisp-ctl configure
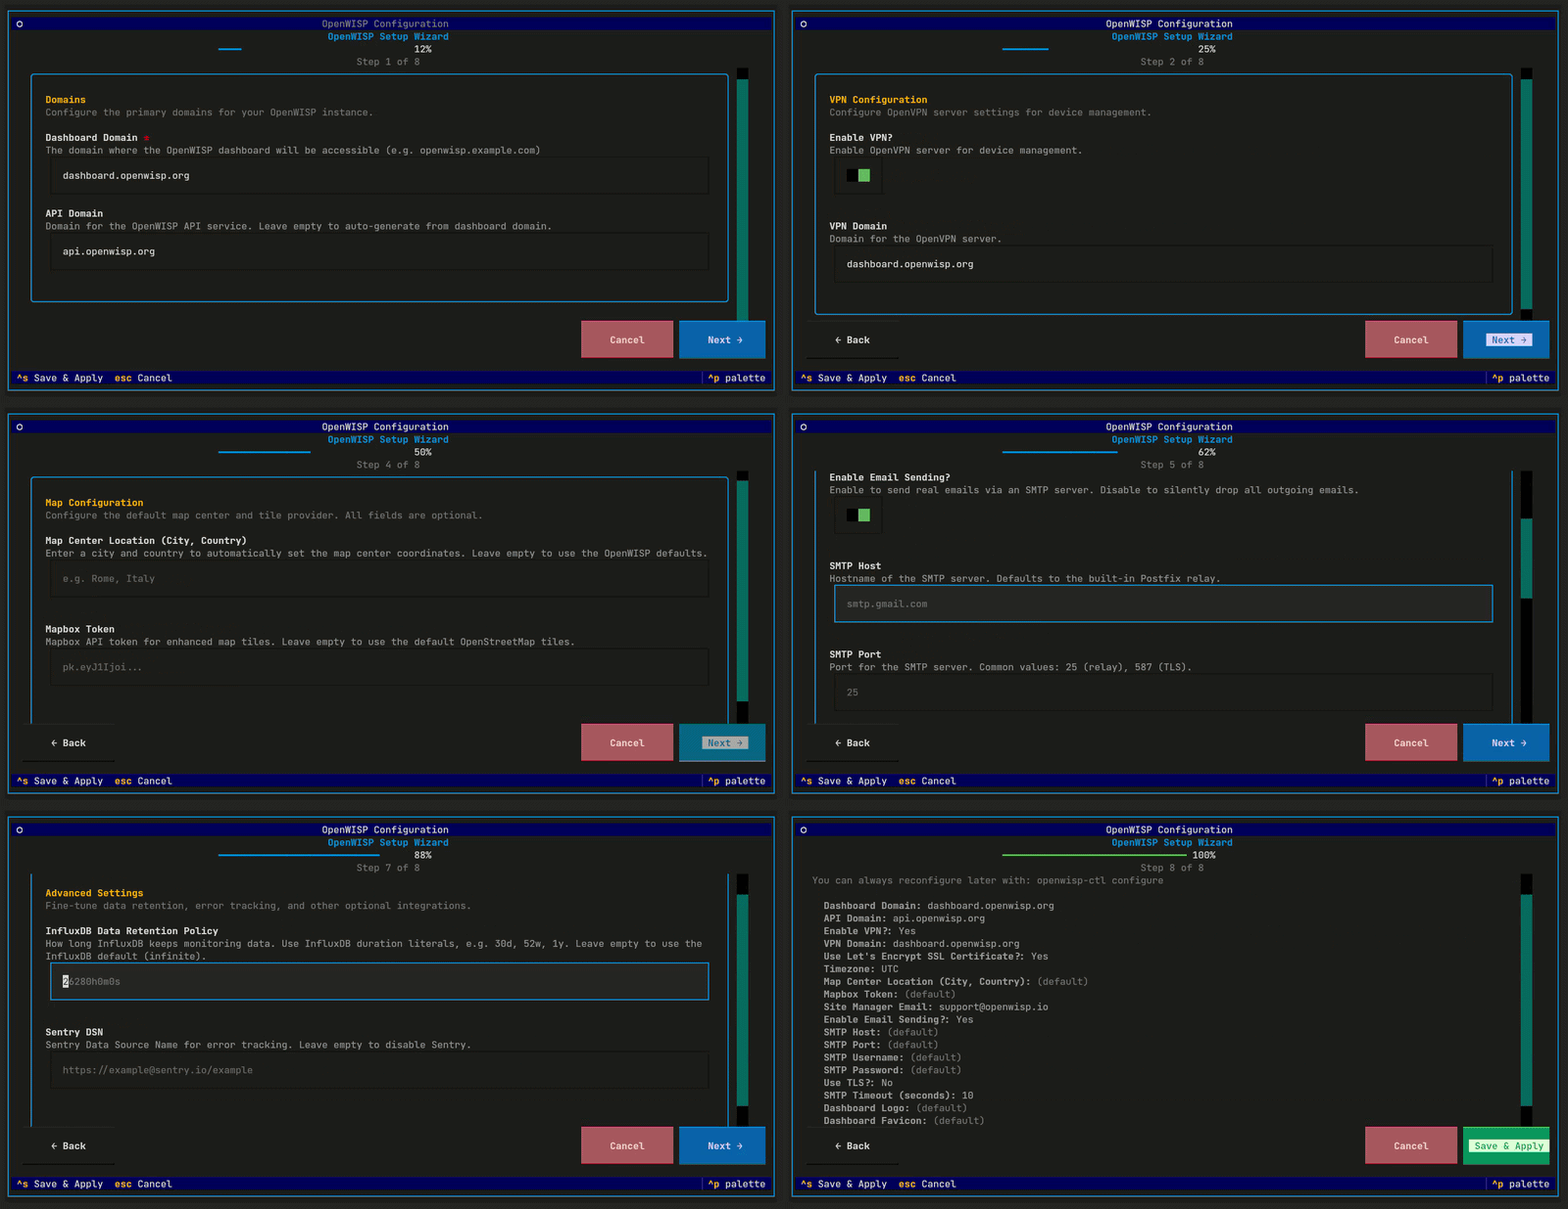
The wizard asks a series of questions to set up your OpenWISP instance. Pay particular attention to these settings:
Dashboard domain: The domain where you will access the OpenWISP administration interface, for example,
openwisp.example.com.API domain: The domain your devices will use to communicate with OpenWISP, for example,
api.example.com.VPN domain: The domain used by OpenVPN clients to connect to the server. It defaults to the dashboard domain; you can keep this default unless you need a separate VPN domain.
SSL certificates: Choose whether the wizard should provision certificates using Let's Encrypt. Before enabling this option, update the DNS records for the domains that need certificates to point to the instance's public IP address. Make sure the records resolve to this address before continuing.
Site Manager Email: Enter the email address to use when creating your user account.
Logo: Optionally add a logo for your instance.
Choose Save and Apply to save your settings and exit the wizard. At
the installation confirmation prompt, enter Y to install and start
OpenWISP. This may take several minutes.
When setup finishes, the command displays your login credentials. Open the dashboard domain you configured and sign in using those credentials.
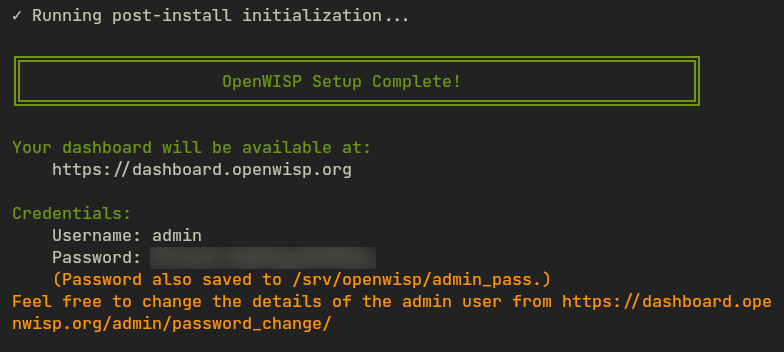
The dashboard address and login credentials shown when setup completes.