How to Set Up a Wireless Mesh Network
Introduction & Prerequisites
What is a Mesh Network?
A mesh network is a decentralized network architecture where each node not only communicates with its immediate neighbors but also relays data for other mesh nodes, creating a peer-to-peer network.
The word "mesh" primarily describes the interconnected topology of the network, while wireless mesh networks specifically refer to mesh networks deployed using standard WiFi bands (2.4 GHz / 5 GHz) as the physical connection medium.
The advantages of this network architecture include:
Resilience: Due to its interconnected topology, there's no single point of failure, so the dynamic routing mesh protocols used to route traffic are able to implement self-healing behavior, rerouting traffic along alternative paths when a link fails. This redundancy ensures continued operation and makes the network resilient to temporary failures.
Flexibility: Deploying new nodes or relocating existing ones is straightforward due to consistent configurations across all nodes. This allows the network to scale without increasing configuration maintenance costs. Additionally, ad-hoc deployment is possible without extensive planning.
These benefits make mesh networking technologies particularly valuable for expanding WiFi coverage area in large spaces like offices, spacious houses, and rural areas, while controlling deployment and maintenance costs.
How to configure a wireless mesh network?
In this tutorial, we'll guide you through the best practices for mesh network setup using the mesh mode (also known as 802.11s) on OpenWrt through OpenWISP. Additionally, we'll provide valuable tips on monitoring and maintaining the mesh network, focusing on signal strength and network performance.
This tutorial focuses on using open source solutions for mesh networking.
Firmware Requirements
In order to use mesh mode with wireless encryption, your firmware needs to
be equipped with a version of the wpad package which supports mesh
encryption.
Please refer to the OpenWrt 802.11s documentation for more information.
Note
The OpenWrt firmware image provided for the OpenWISP Demo
System includes the full wpad package by default.
General Assumptions
In this tutorial we make a few assumptions and choices which are explained below.
At Least 2 Devices
We assume you are already managing and monitoring at least two devices through your OpenWISP instance.
One Radio Available
We require at least one radio named radio0 to be available and enabled
for the successful execution of this tutorial.
For simplicity, we will focus on a single radio, but it's important to note that the mesh functionality can be extended to multiple radios if necessary. This can improve backhaul performance and reduce interference.
Alternatively, you have the option of running the mesh on one radio while the access points operate on another radio to avoid interference and increase the performance of the mesh network, mitigating issues like interference, optimizing for latency and throughput.
However, these additional scenarios are not explained in this tutorial and are left as an exercise for the reader.
Existing DHCP server on the LAN
WiFi in mesh mode (802.11s) operates at the layer 2 protocol, enabling us to bridge the mesh interface with the LAN interface, effectively creating a wireless extension of the LAN network.
This configuration assumes that the mesh devices will function as wireless extenders for an existing LAN, already equipped with a DHCP server.
Consequently, we will define a br-lan interface in DHCP client mode,
with the spanning tree protocol enabled.
This helps prevent loops in case of accidental Ethernet cable connections to another mesh extender within the LAN.
Additionally, we will disable the default DHCP server on the LAN interface, which comes preconfigured in OpenWrt.
Creating the Template
Hint
If you don't know what a template is, please see Configuration Templates.
Note
This template is also available in our Demo System as Mesh Demo, feel free to try it out!
How to automate a mesh network?
In this section we'll explain how to automate the provisioning of new mesh nodes with a Mesh Configuration Template.
From the OpenWISP navigation menu, go to Configurations and then
Templates, from here click on the Add template.
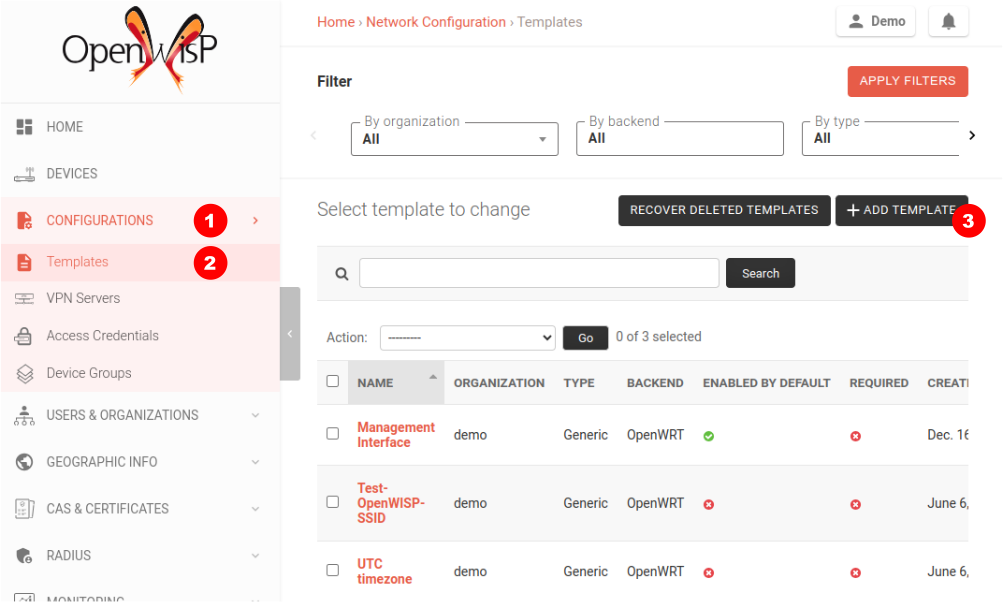
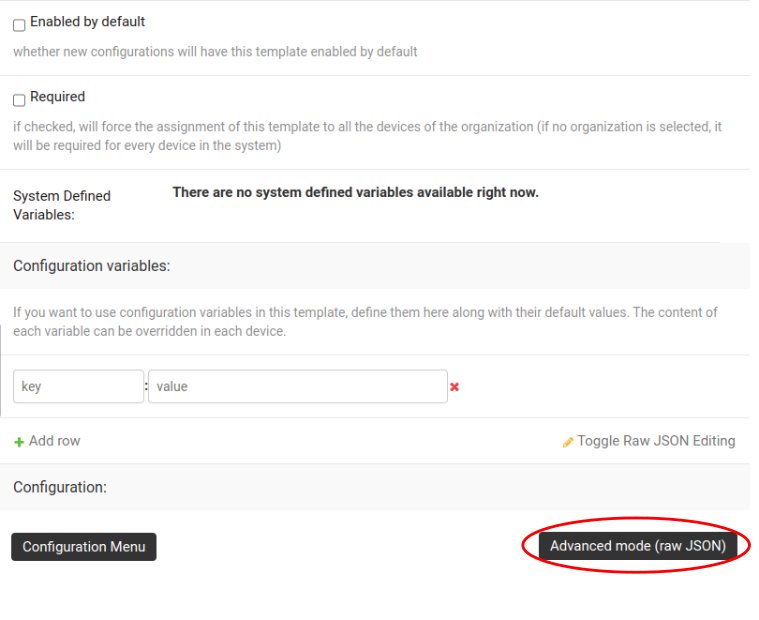
Fill in name, organization, leave type set to "Generic", backend set to "OpenWrt", scroll down to the Configuration section, then click on "Advanced mode (raw JSON)".
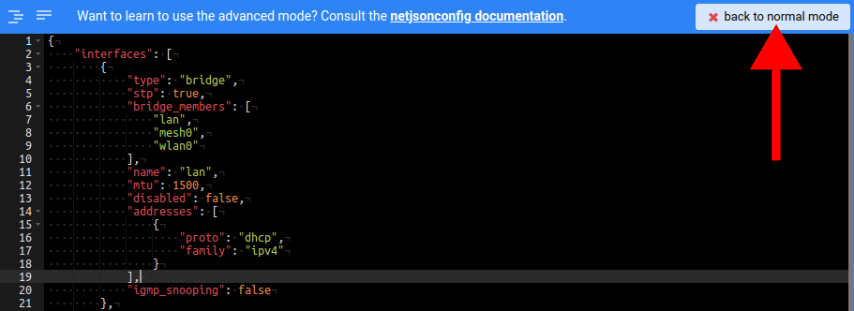
Once the advanced mode editor is open you can paste the following NetJSON:
{
    "interfaces": [
        {
            "name": "lan",
            "type": "bridge",
            "mtu": 1500,
            "disabled": false,
            "stp": true,
            "igmp_snooping": false,
            "bridge_members": [
                "lan",
                "mesh0",
                "wlan0"
            ],
            "addresses": [
                {
                    "proto": "dhcp",
                    "family": "ipv4"
                }
            ]
        },
        {
            "type": "wireless",
            "name": "mesh0",
            "mtu": 1500,
            "disabled": false,
            "wireless": {
                "mode": "802.11s",
                "radio": "radio0",
                "ack_distance": 0,
                "rts_threshold": 0,
                "frag_threshold": 0,
                "mesh_id": "mesh0",
                "encryption": {
                    "protocol": "wpa2_personal",
                    "key": "0penW1SP0987654321",
                    "disabled": false,
                    "cipher": "auto",
                    "ieee80211w": "0"
                },
                "network": [
                    "lan"
                ]
            }
        },
        {
            "type": "wireless",
            "name": "wlan0",
            "mtu": 1500,
            "disabled": false,
            "wireless": {
                "mode": "access_point",
                "radio": "radio0",
                "ssid": "Mesh AP",
                "hidden": false,
                "wds": false,
                "wmm": true,
                "isolate": false,
                "ieee80211r": true,
                "reassociation_deadline": 1000,
                "ft_psk_generate_local": false,
                "ft_over_ds": true,
                "rsn_preauth": false,
                "macfilter": "disable",
                "maclist": [],
                "encryption": {
                    "protocol": "wpa2_personal_mixed",
                    "key": "meshApTesting1234",
                    "disabled": false,
                    "cipher": "ccmp",
                    "ieee80211w": "1"
                },
                "network": [
                    "lan"
                ]
            }
        }
    ],
    "files": [
        {
            "path": "/etc/openwisp/pre-reload-hook",
            "mode": "0700",
            "contents": "#!/bin/sh\n\n# delete any br-lan definition to avoid conflicts\nuci delete network.device1\n\n# make sure radio is enabled and on the same channel\nband=$(uci get wireless.radio0.band)\nhwmode=$(uci get wireless.radio0.hwmode)\nif [ \"$band\" = \"2g\" ] || [ \"$hwmode\" = \"11g\" ]; then\n  channel=1\nelif [ \"$band\" = \"5g\" ] || [ \"$hwmode\" = \"11a\" ]; then\n  channel=36\nfi\nuci set wireless.radio0.channel=\"$channel\"\nuci set wireless.radio0.disabled='0'\nuci set wireless.radio0.country='US'  # feel free to customize the country code\nuci commit wireless\n\n# ensure DHCP server on the lan is disabled\nuci set dhcp.lan.ignore='1'\nuci set dhcp.lan.dhcpv6='disabled'\nuci set dhcp.lan.ra='disabled'\nuci commit dhcp\n\n# increase retries of the config test to account for\n# temporary network failures caused by the reloading of the wifi stack\nuci set openwisp.http.test_retries=8\nuci commit openwisp\n"
        }
    ]
}
Then click on "back to normal mode" to close the advanced mode editor.
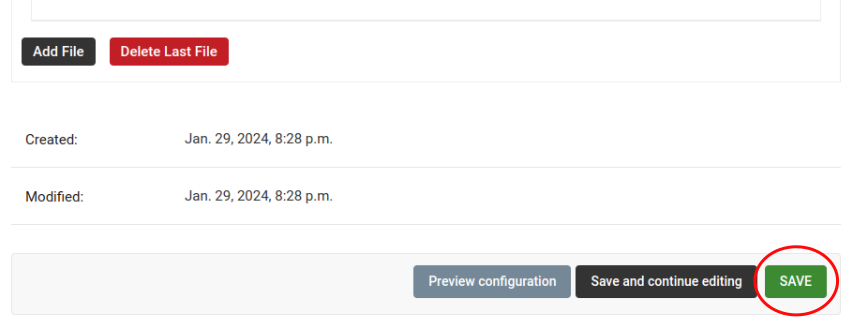
Now you can save the new template.
At this point you're ready to assign the template to your devices, but before doing so you may want to read on to understand the different components of this template:
The
br-landefines a bridge with the following members:lan,mesh0andwlan0.The
mesh0provides the encrypted wireless mesh interface bound toradio0.The
wlan0interface provides WiFi access to the mesh network for clients not equipped with 802.11s.A
pre-reload-hookscript which is executed before OpenWrt reloads its services to make the configuration changes effective.
Why we use a pre-reload-hook script
In the template shared above, we utilize a pre-reload-hook script to execute the following configuration changes:
Ensure that
radio0is enabled, set on a specific channel and country code to allow communication between mesh nodes. You can customize the channel and country code according to your preferences. However, make these changes before deploying your mesh nodes and disconnecting them from the Ethernet network, as modifying the channel or country code on an active mesh network will disrupt it.Disable the default DHCP server preconfigured in OpenWrt on the
br-laninterface to prevent interference with the existing DHCP server in the LAN.Increase the
test_retriesoption of the openwisp-config agent to 8. This enhancement enhances the agent's resilience to temporary failures in reaching the OpenWISP server after applying configuration changes. Mesh configuration changes trigger a reload of the WiFi stack, which may take a few minutes to become effective. During this period, we want to avoid the agent to mistakenly consider the connection as lost, to prevent it from flagging the upgrade as failed and rollback to the previous configuration.
We could have redefined the entire configuration for radio0, the LAN
DHCP server and openwisp-config, but doing so would have posed some
issues:
There's no guarantee that the same radio settings will work uniformly on every hardware supported by OpenWrt. By altering only the necessary settings, we ensure the same template can be applied across a broad spectrum of devices, making the tutorial easy for a wide range of users.
Creating a template that includes all possible settings would result in verbosity, making it challenging for readers to digest.
Once you have successfully set this up, feel free to modify the template configuration and tailor any part to suit your requirements.
Enable the Mesh Template on the Devices
Now is time to apply this mesh template to the nodes that we want to make part of the mesh.
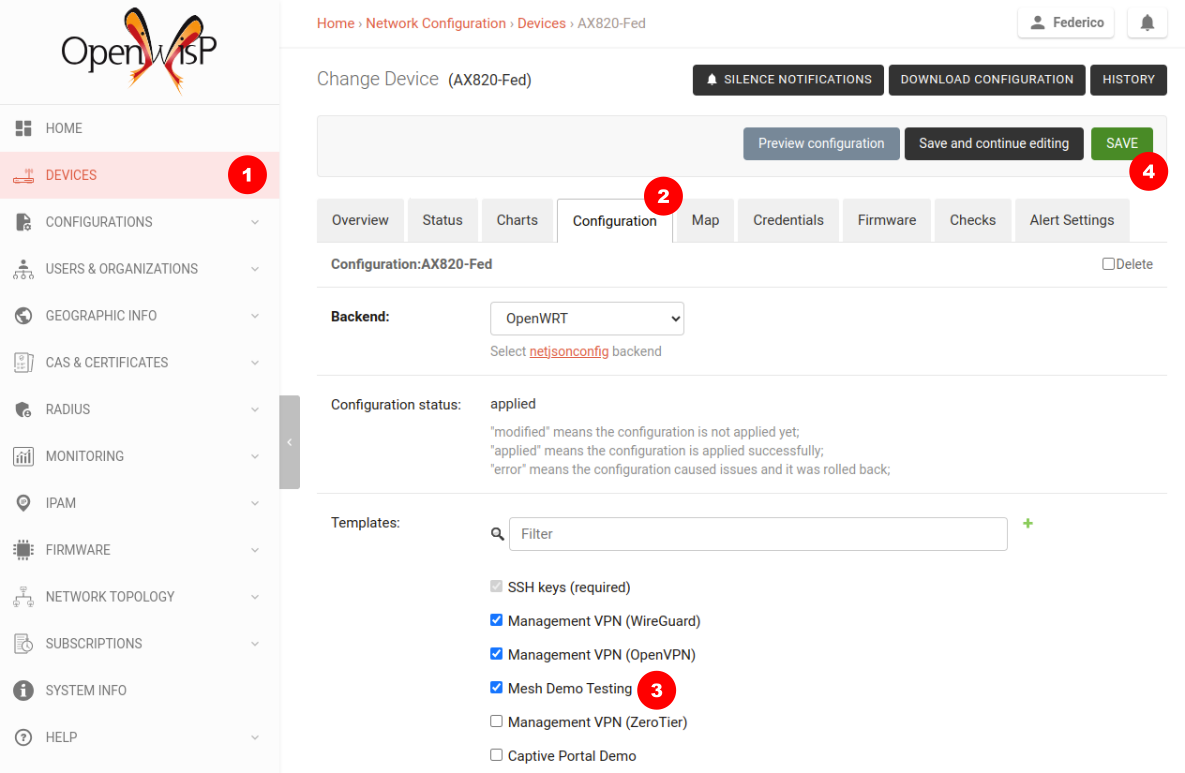
Click on "devices" in the navigation menu, click on the device you want to assign the mesh template to, then go to the "Configuration" tab, select the template just created, then click on save.
Verifying and Debugging
Once the configuration is applied to the device, if you access your device via SSH you can double check that everything worked fine by comparing the output you get from the command outputs shown below.
Check the bridge with brctl show:
bridge name bridge id               STP enabled     interfaces
br-lan              7fff.44d1fad204c5       yes             lan
                                                    wlan0
                                                    mesh0
Check the WiFi interfaces with iwinfo:
mesh0 ESSID: "mesh0"
Access Point: 44:D1:FA:D2:00:01
Mode: Mesh Point Channel: 1 (2.412 GHz) HT Mode: HT20
Center Channel 1: 1 2: unknown
Tx-Power: 20 dBm Link Quality: 68/70
Signal: -42 dBm Noise: -87 dBm
Bit Rate: 1.0 MBit/s
Encryption: WPA3 SAE (CCMP)
Type: nl80211 HW Mode(s): 802.11ax/b/g/n
Hardware: 14C3:7915 14C3:7915 [MediaTek MT7915E]
TX power offset: none
Frequency offset: none
Supports VAPs: yes PHY name: phy0
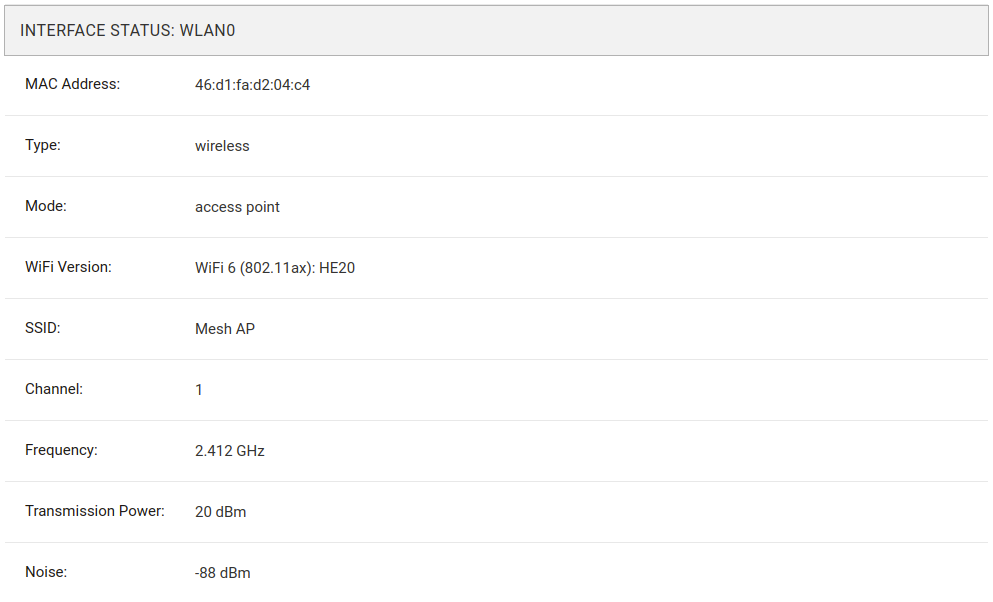
wlan0 ESSID: "Mesh AP"
Access Point: 44:D1:FA:D2:00:01
Mode: Master Channel: 1 (2.412 GHz) HT Mode: HE20
Center Channel 1: 1 2: unknown
Tx-Power: 20 dBm Link Quality: unknown/70
Signal: unknown Noise: -85 dBm
Bit Rate: unknown
Encryption: mixed WPA2/WPA3 PSK/SAE (CCMP)
Type: nl80211 HW Mode(s): 802.11ax/b/g/n
Hardware: 14C3:7915 14C3:7915 [MediaTek MT7915E]
TX power offset: none
Frequency offset: none
Supports VAPs: yes PHY name: phy0
Once you have assigned the template to at least two devices which are
close to each other, you can verify whether they have formed a mesh with
iw mesh0 station dump, which should return the number of connected
mesh nodes (called stations):
Station 44:d1:fa:d2:04:d6 (on mesh0)
    inactive time:  10 ms
    rx bytes:       9050195
    rx packets:     80356
    tx bytes:       1169064
    tx packets:     7196
    tx retries:     0
    tx failed:      0
    rx drop misc:   200
    signal:         -42 [-43, -49] dBm
    signal avg:     -42 [-43, -49] dBm
    Toffset:        287058701286 us
    tx bitrate:     243.7 MBit/s HE-MCS 10 HE-NSS 2 HE-GI 1 HE-DCM 0
    tx duration:    32732793 us
    rx bitrate:     258.0 MBit/s HE-MCS 10 HE-NSS 2 HE-GI 0 HE-DCM 0
    rx duration:    3451735 us
    airtime weight: 256
    mesh llid:      0
    mesh plid:      0
    mesh plink:     ESTAB
    mesh airtime link metric: 48
    mesh connected to gate: yes
    mesh connected to auth server:  no
    mesh local PS mode:     ACTIVE
    mesh peer PS mode:      ACTIVE
    mesh non-peer PS mode:  ACTIVE
    authorized:     yes
    authenticated:  yes
    associated:     yes
    preamble:       long
    WMM/WME:        yes
    MFP:            yes
    TDLS peer:      no
    DTIM period:    2
    beacon interval:100
    connected time: 3511 seconds
    associated at [boottime]:       272718.754s
    associated at:  1706572676925 ms
    current time:   1706576187500 ms
If you didn't get the expected results we recommend looking at the
logread output and look for any critical error shown in the log
output, this should help you to fix it.
Monitoring the Mesh Nodes
If everything has worked out successfully and you have the OpenWISP monitoring agent running correctly on your device, you should start seeing monitoring information about the mesh network in the status tab of the device page.
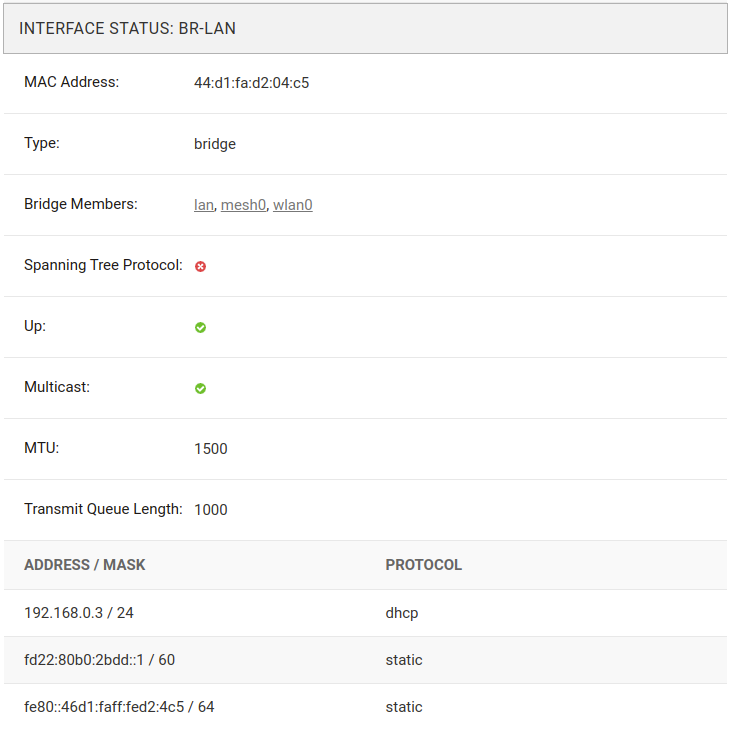
Bridge interface:
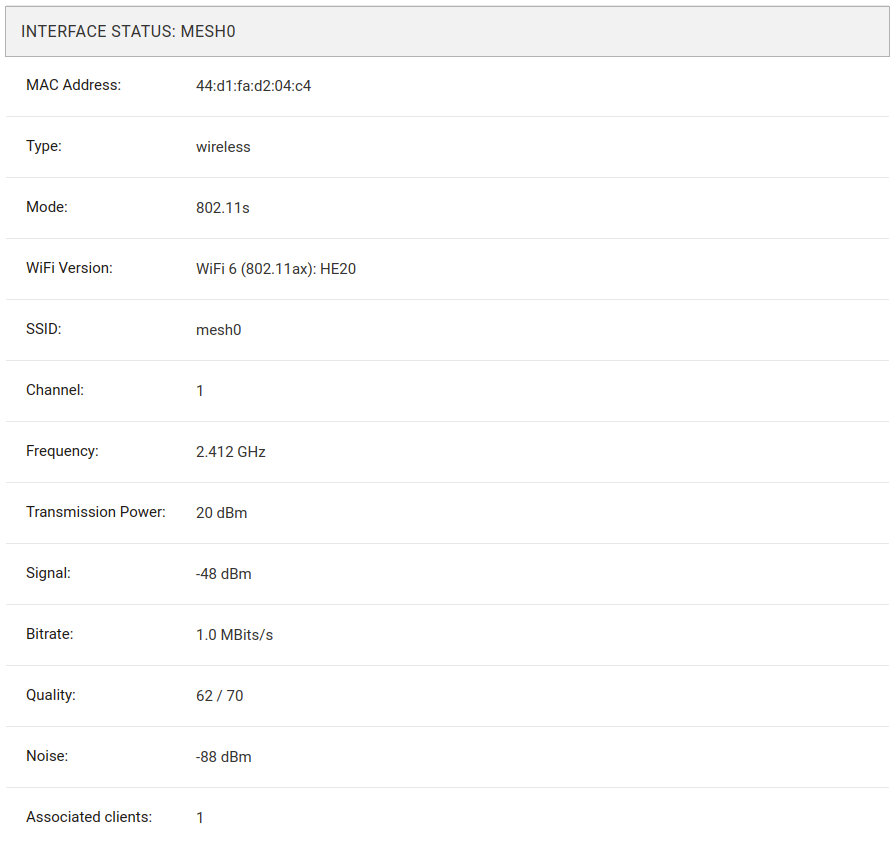
Mesh0 interface:

Wlan0 interface:
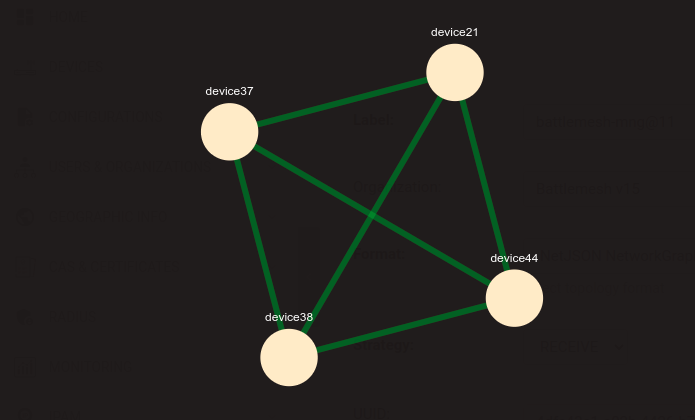
Mesh Topology Collection and Visualization
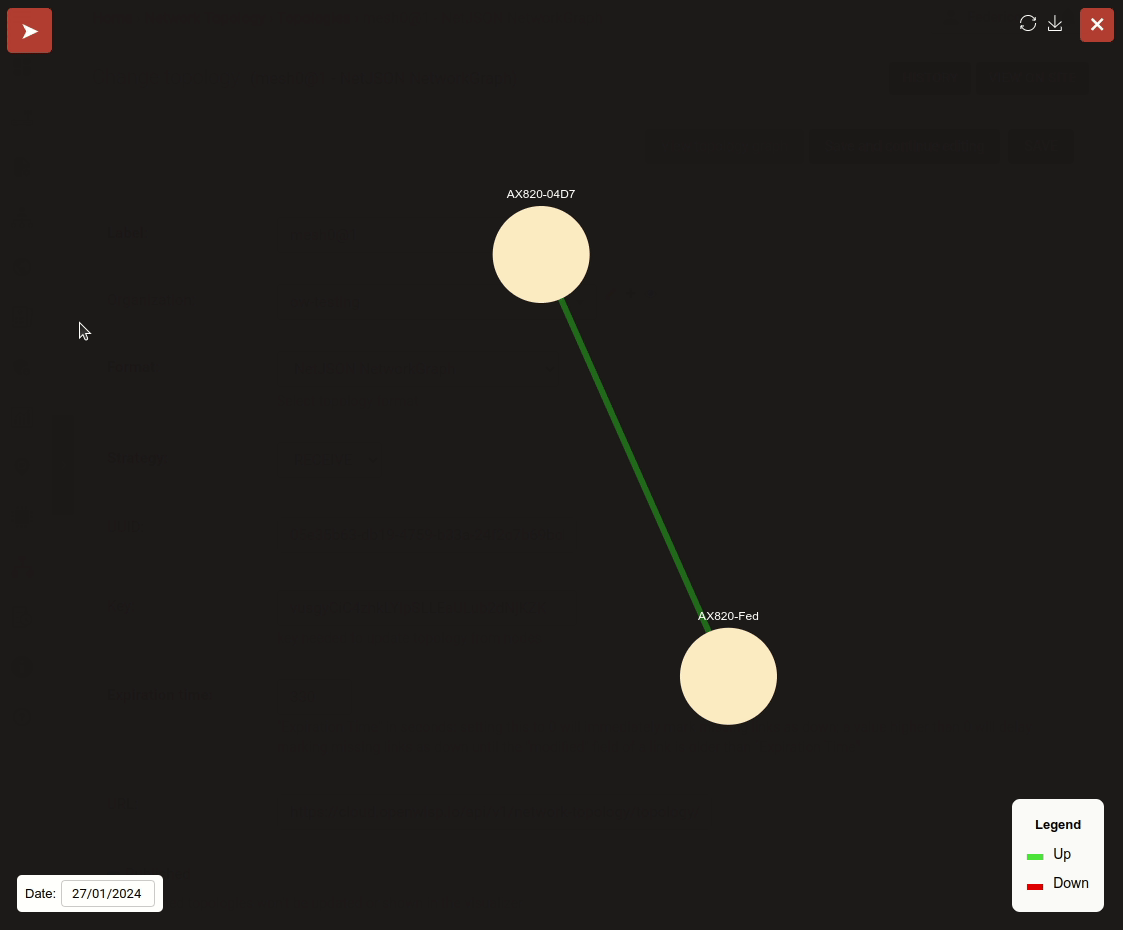
In June 2023, we introduced a new feature to the Network Topology module of OpenWISP, enabling the automatic collection of mesh network topology data from for visualization purposes.
Setting up this feature is beyond the scope of this tutorial, but we provide pointers to demonstrate its usefulness and guide you in finding the information needed to set it up:
Github pull request: [feature] WiFi Mesh integration
If you have been playing with our Demo System, you can try this feature there! You only have to register at least 2 devices to the Demo System, enable the Mesh Demo template on your devices and wait a few minutes until the data is collected and shown in the Network Topology List as shown below.

Changing the Default 802.11s Routing Protocol
Switching the mesh routing protocol can be beneficial for optimizing the most efficient path between two nodes and reducing the number of hops, but it is essential to configure it correctly to achieve optimal performance.
Using a mesh routing protocol other than the default protocol shipped in the 802.11s implementation is out of scope of this tutorial but can be done.
You will need to turn off mesh forwarding and configure the routing daemon of your choice.