Install OpenWISP for Testing in a VirtualBox VM
If you want to try out OpenWISP in your own development environment, the safest way is to use a VirtualBox Virtual Machine (from here on VM).
Using Vagrant
Since August 2018 there's a new fast and easy way to install OpenWISP for testing purposes leveraging Vagrant, a popular open source tool for building and maintaining portable virtual software development environments.
To use this new way, clone the repository vagrant-openwisp2, it contains the
instructions (in the README.md) and the vagrant configuration to
perform the automatic installation.
Alternatively, you can read on to learn how to install VirtualBox and run ansible-openwisp2 manually, this is useful if you need to test advanced customizations of OpenWISP.
Installing Debian 11 on VirtualBox
Install VirtualBox and create a new Virtual Machine running Debian 11. A step-by-step guide is available here, however we need to change a few things to get ansible working.
VM Configuration
Proceed with the installation as shown in the guide linked above, and come back here when you see this screen:
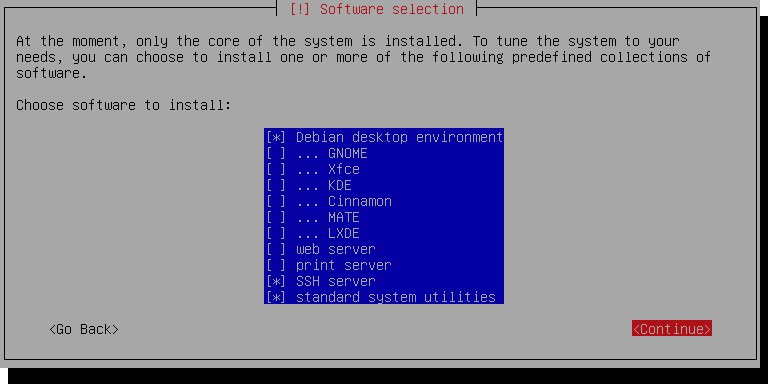
We're only running this as a server, so you can uncheck Debian desktop
environment. Make sure SSH server and standard system utilities
are checked.
Next, add a Host-only Network Adapter and assign an IP address to the VM.
On the Main VirtualBox page, Go to
File > Host Network ManagerClick the + icon to create a new adapter
Set the IPv4 address to
192.168.56.1and the IPv4 Network Mask to255.255.255.0. You may need to selectConfigure Adapter Manuallyto do this. The IPv6 settings can be ignored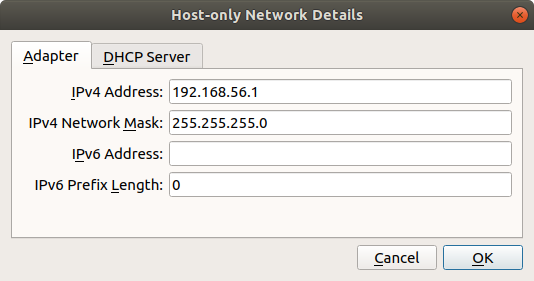
Shut off your VM
In your VM settings, in the Network section, click Adapter 2 and Enable this Adapter
Select Host-only adapter and the name of the adapter you created
Boot up your VM, run
su, and type in your superuser passwordRun
ls /sys/class/netand take note of the outputRun
nano /etc/network/interfacesand add the following at the end of the file:auto enp0s8 iface enp0s8 inet static address 192.168.56.2 netmask 255.255.255.0 network 192.168.56.0 broadcast 192.168.56.255Replace
enp0s8with the network interface not present in the file but is shown when runningls /sys/class/net.Save the file with CTRL+O then Enter, and exit with CTRL+X.
Restart the machine by running
reboot.
Make sure you can access your VM via ssh:
ssh 192.168.56.2
Back to your local machine
Proceed with these steps in your local machine, not the VM.
Step 1: Install ansible
Step 2: Install the OpenWISP2 role for Ansible
Step 3: Set up a working directory
Step 4: Create the hosts file
Create an ansible inventory file named hosts in your working
directory (i.e. not in the VM) with the following contents:
[openwisp2]
192.168.56.2
Step 5: Create the ansible playbook
In the same directory where you created the host file, create a file
named playbook.yml which contains the following:
- hosts: openwisp2
  roles:
    - openwisp.openwisp2
  # the following line is needed only when an IP address is used as the inventory hostname
  vars:
      postfix_myhostname: localhost
Step 6: Run the playbook
ansible-playbook -i hosts playbook.yml -b -k -K --become-method=su
When the playbook ran successfully, you can log in at
https://192.168.56.2/admin with the following credentials:
username: admin
password: admin